Hi everyone,
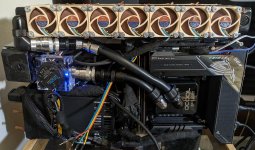
For this project I had a hard time to figure out which 40mm radiator would do the job : they were made to fit into a 1U case, and therefore tested with industrial fans; I love silence, these fans were never an option.
I was tempted by the hexa, but I finally chose the hepta because it is the HPE version : fins density is increased, so performances are better, I figured it would be better if I upgrade for some more power-hungry hardware.
I am very happy because Alphacool sponsored my project : I bought some stuff, but it would not have been possible if they didn't send some fittings, so here is a big thank you to the Alphacool team !
My project is a mini PC, I started from something pretty big and I kept shrinking it, lately I switched my DDC to a DC-LT, and I switched my radiator to a smaller one; I was not sure the DC-LT would do the job, because my DDC-PWM was optimized to pump 1150L/H max, compared to a 100L/H DC-LT, it seems like David vs Goliath.
I had to be cautious about how and where to put my DC-LT pumps, because of my GPU waterblock's design.
I switched my SFX power supply to a flex ATX as well.
Performance-wise the components do not heat over 60c, I have a 1080ti with a slight overclock and a 8700k optimized in there, I would say the hepta HPE 40mm radiator would dissipate around 400w without any problem with a push-pull 40x10mm fan configuration, the whole thing is pretty silent.
Here are some pictures of my build at the moment, it is a hive because there are a lot of little wings in there and the color of my build makes me think about bees, I will update soon for the rest of the enclosure.
As one can see I like quick disconnect fittings, they provide easier maintenance.
Last edited:

 Feel free to keep us updated. If you need help with anything, just ask
 ")