You are using an out of date browser. It may not display this or other websites correctly.
You should upgrade or use an alternative browser.
You should upgrade or use an alternative browser.
Project Hush!
- Thread starter Monkey Puzzle
- Start date
Monkey Puzzle
Member
Very cool everything! By the way, the Eisblock cooler is on its way to you! ;-)
Thanks Thomas - it's a very attractive waterblock - it arrived today! along with a very cool modding mat and some ?stress balls?! Thank you very much, that was unexpected!
Last edited:

A little early Christmas present! ;-) Have fun with it!Thanks Thomas - it's a very attractive waterblock - it arrived today! along with a very cool modding mat and some ?stress balls?! Thank you very much, that was unexpected!
Monkey Puzzle
Member
Glorious. Can't wait to see it get stuffed like a turkey !
Brrrrraaakkkk! Turkey getting stuffed, and merry Christmas!
Been a bit snowed under with flu and family things.
Gave the walnut-veneered wall 2 coats of the finishing oil (tung/polyurethane mix mainly). Got an EK FLT80 reservoir and gold-plated D5 bottom. Probably going to live like in the video below as gives a super short loop. Very shiny! Replaced some of the countersunk black screws with GR5 titanium ones. Made a temporary polystyrene block to hold up to pump (need to make a vibration-dampened bracket). Soft tubing doesn't like any bend radius with an unsecured pump, hence the pump being at a funny angle in the vid.
Hammered in the 14mm pipe bender pivot pin (it was misaligned by about 2mm for the two halves with the pipe grooves. I hammered through by perhaps 2mm with a centre punch chisel, and inserted two external 8mm circlips as spacers for tge pivot pin. Seems to be about right from eyeballing. The polished and lacquered copper hard-tubing with the golden corsair (bitspower) fittings will be added later.
Something of a temporary loop atm - need to check the GTX 4090 works fine aircooled before putting the block on and redoing the loop, so just the CPU in the loop currently. Doesn't leak!
Got a Bitspower vertical GPU bracket.
https://shop.bitspower.com/index.php?route=product/product&product_id=7012
It can have two cards vertical, and it's modular so you can remove half when one one card is in use. It's CNCed and looks very nice, though it's black (I think anodised rather than powder-coated). May well be fine as the motherboard is black and looks pretty good installed, but need to see what it's like when the cards in place.
Anyhow, here's a vid. Will post more photos for the bits I described, but it's 10:51pm and I wanted to make the xmas turkey pun and fighting against the cluck a bit here. Merry Christmas all!
 YouCut_20221225_222010169 by Tom ., on Flickr
Monkey Puzzle
Member
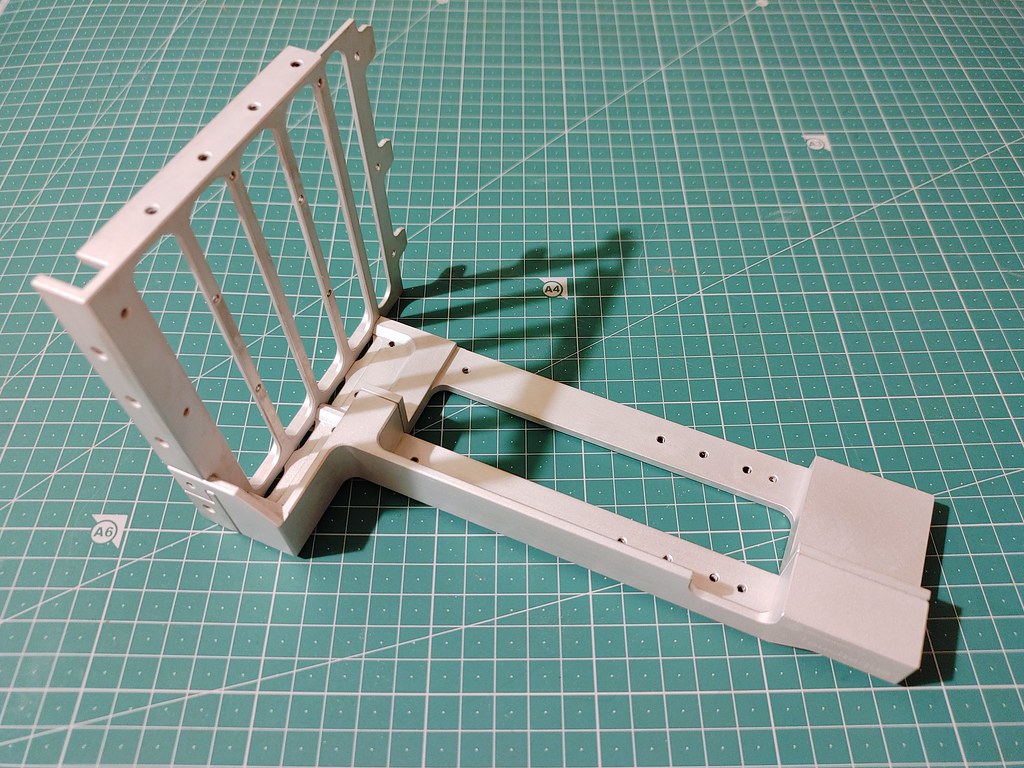
Here's the Bitspower vertical GPU conversion bracket (disassembled). As with most Bitspower stuff it's very nice, CNCed aluminium, though anodised black which doesn't fit the walnut and shiny aluminium of the rest of the case.
 20230102_224607_HDR by Tom ., on Flickr
Thanks Andy (Vault-Tec) for the advice on stripping the anodising with sodium hydroxide - from a bit of reading chromic/phosphoric acid is cleaner at just removing the aluminium oxide/dye of the anodised layer and leaving the underlying aluminium and surface finish intact if anyone needs dimension-critical de-anodisation or wants to strip the reanodise. I'm going to sand down to mirror surface, and have caustic soda granules already and no want to get phosphoric or chromic acid and the hazard and difficulty that poses, so caustic soda it is!
I used 12 teaspoons (~60mls) of caustic soda granules in 3l of water at around 45C. Very quick reaction! Stripped the anodising layer in around 90 seconds. Slower would probabIy be better (less chance of pitting from localised rapid reaction with a faster overall stripping apparently, though I saw no issues). I put screws in all the threads with medium strength loctite 243 threadlocker in to seal to preserve the anodising on the screwthreads to keep them anodised and hopefully prevent galling in future.
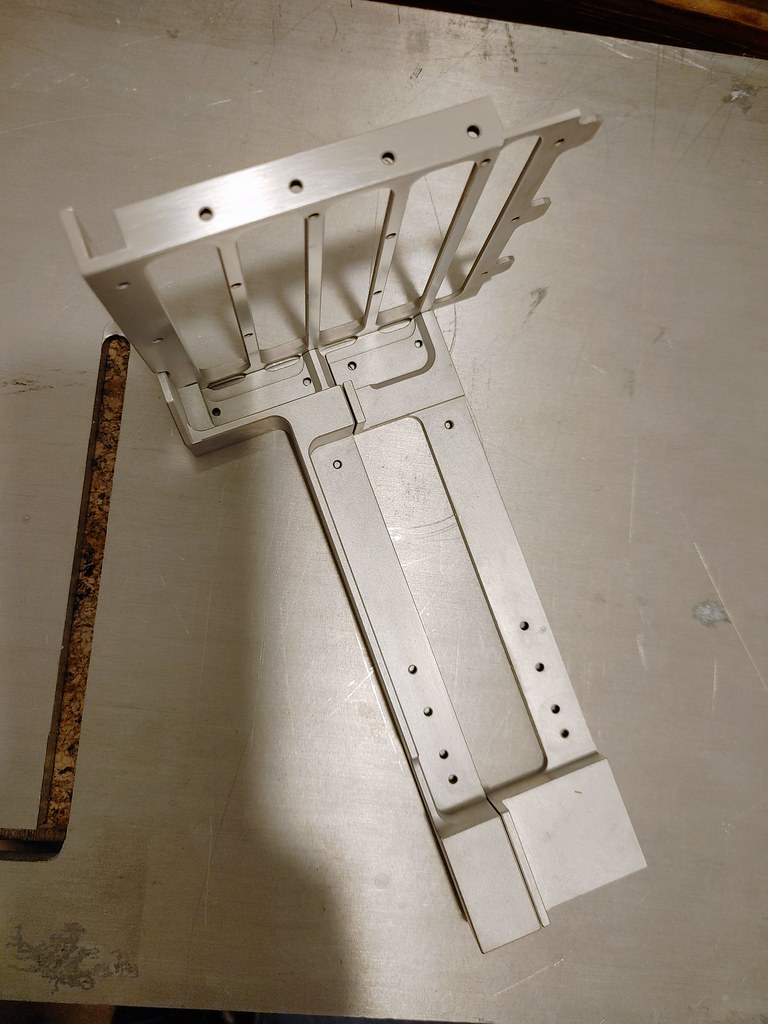
Here's the vertical GPU bracket after and assembled - here with both 'struts' for 2 vertical cards - it'll be with just the left-hand gpu strut used. The odd smudge there is just a bit of dye and smut that's stubborn to get out of the material-blasted aluminium with an old toothbrush - will go with sanding and polishing.
 20230105_154119_HDR by Tom ., on Flickr
 20230105_154148_HDR by Tom ., on Flickr
A little bit of lapping of the flat faces of the pci-bracket plate with 600 grit sandpaper. It's quite delicate with chamfered edges... I'll only be using the left-strut to vertically mount the GPU (the other one is unneeded restriction to passive upwards airflow). I'll end up mirror-polishing it all, bar maybe bits that only will be seen from the back of the case. I'm leaving the other bits unsanded for the moment, as I have some plans for that solid block of aluminium at the end and need to keep the faces dimensionally accurate/true until that's done...
 20230105_200749_HDR by Tom ., on Flickr
 20230105_200727_HDR by Tom ., on Flickr
20230102_224607_HDR by Tom ., on FlickrThanks Andy (Vault-Tec) for the advice on stripping the anodising with sodium hydroxide - from a bit of reading chromic/phosphoric acid is cleaner at just removing the aluminium oxide/dye of the anodised layer and leaving the underlying aluminium and surface finish intact if anyone needs dimension-critical de-anodisation or wants to strip the reanodise. I'm going to sand down to mirror surface, and have caustic soda granules already and no want to get phosphoric or chromic acid and the hazard and difficulty that poses, so caustic soda it is!
I used 12 teaspoons (~60mls) of caustic soda granules in 3l of water at around 45C. Very quick reaction! Stripped the anodising layer in around 90 seconds. Slower would probabIy be better (less chance of pitting from localised rapid reaction with a faster overall stripping apparently, though I saw no issues). I put screws in all the threads with medium strength loctite 243 threadlocker in to seal to preserve the anodising on the screwthreads to keep them anodised and hopefully prevent galling in future.
Here's the vertical GPU bracket after and assembled - here with both 'struts' for 2 vertical cards - it'll be with just the left-hand gpu strut used. The odd smudge there is just a bit of dye and smut that's stubborn to get out of the material-blasted aluminium with an old toothbrush - will go with sanding and polishing.
20230105_154119_HDR by Tom ., on Flickr
20230105_154148_HDR by Tom ., on FlickrA little bit of lapping of the flat faces of the pci-bracket plate with 600 grit sandpaper. It's quite delicate with chamfered edges... I'll only be using the left-strut to vertically mount the GPU (the other one is unneeded restriction to passive upwards airflow). I'll end up mirror-polishing it all, bar maybe bits that only will be seen from the back of the case. I'm leaving the other bits unsanded for the moment, as I have some plans for that solid block of aluminium at the end and need to keep the faces dimensionally accurate/true until that's done...
20230105_200749_HDR by Tom ., on Flickr
20230105_200727_HDR by Tom ., on Flickr
Last edited:
Monkey Puzzle
Member
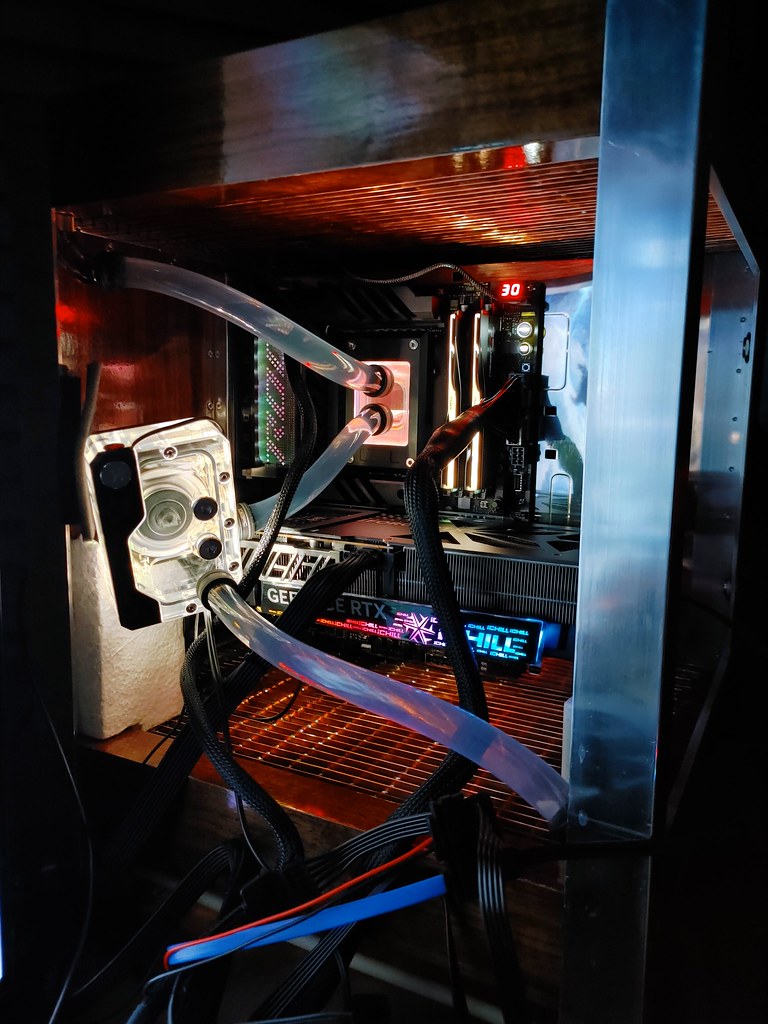
Sorry for delay in updating - life got in the way. Right then. System in, ghetto-rigged.
Photos below
That big fat heatsink on the 4090 goes well past the PCI bracket and made fitting thumbscrews to attach the 4090 to the pci bracket very, very annoying
That is a block of polystyrene and some neoprene mat temporarily supporting the D5 pump/reservoir until I fit the gpu block and bracket and know what height to attach a pump bracket to the case. That is a bottle of Copydex glue helping support the 4090. PSU is sat external in a coolermaster vertical frame waiting for screwholes to attach to the back of the case, wires everywhere. Tubing and compression fittings are temporary - needed to check everything works before positioning and fitting the lovely Alphacool Eisblock Aurora waterblock and Bitspower vertical GPU bracket, hard polished copper piping and shiny gold corsair compression fittings used.
Lighting on the TechN CPU block, EK FLT 80 D5 reservoir and G skill trident z5 neo RAM all synced to a low whitish light. Inno3D ichill card RGB lighting decided not to play ball with their own ITune overclocking/RGB control software, and so cycles through the rainbow...
Just the CPU in the loop atm, with the GTX4090 aircooled sat it in spewing most of the hot air into the case to warm the top of the passive radiator! 7950x at it's stock, auto-voltage, which seems very high around 1.43 + Vcore ish at times. Absolutely ragging all cores in linpack in a hot room yesterday and I saw it get to 89C max with cpu drawing 205w in hardware monitoring software, with 42C at largely idle on desktop web-browsing. Need to get to grips with the dynamic clocking - seems a little tricky to know how the CPU is doing and will need to tinker around with power curves etc. From HWMonitor logs it's boosted up to 6510mhz max on core0 during gaming. No idea if that's decent! Today in normal ambient room (maybe 19C) and the 7950x seems to sit at around 60C using around 90w for the CPU (at 4k with 4090 gpu) after an hour or so - presume the game is GPU limited. Corsair AX1600i PSU doesn't spin up - gives a brief spin up at boot then just runs passive (think it starts spinning at above 600w or so wattage draw).
Here's a few pics
 20230213_232438_HDR by Tom ., on Flickr
 20230213_232417_HDR by Tom ., on Flickr
 20230213_215038_HDR by Tom ., on Flickr
 20230213_215105_HDR by Tom ., on Flickr
Photos below
That big fat heatsink on the 4090 goes well past the PCI bracket and made fitting thumbscrews to attach the 4090 to the pci bracket very, very annoying
That is a block of polystyrene and some neoprene mat temporarily supporting the D5 pump/reservoir until I fit the gpu block and bracket and know what height to attach a pump bracket to the case. That is a bottle of Copydex glue helping support the 4090. PSU is sat external in a coolermaster vertical frame waiting for screwholes to attach to the back of the case, wires everywhere. Tubing and compression fittings are temporary - needed to check everything works before positioning and fitting the lovely Alphacool Eisblock Aurora waterblock and Bitspower vertical GPU bracket, hard polished copper piping and shiny gold corsair compression fittings used.
Lighting on the TechN CPU block, EK FLT 80 D5 reservoir and G skill trident z5 neo RAM all synced to a low whitish light. Inno3D ichill card RGB lighting decided not to play ball with their own ITune overclocking/RGB control software, and so cycles through the rainbow...
Just the CPU in the loop atm, with the GTX4090 aircooled sat it in spewing most of the hot air into the case to warm the top of the passive radiator! 7950x at it's stock, auto-voltage, which seems very high around 1.43 + Vcore ish at times. Absolutely ragging all cores in linpack in a hot room yesterday and I saw it get to 89C max with cpu drawing 205w in hardware monitoring software, with 42C at largely idle on desktop web-browsing. Need to get to grips with the dynamic clocking - seems a little tricky to know how the CPU is doing and will need to tinker around with power curves etc. From HWMonitor logs it's boosted up to 6510mhz max on core0 during gaming. No idea if that's decent! Today in normal ambient room (maybe 19C) and the 7950x seems to sit at around 60C using around 90w for the CPU (at 4k with 4090 gpu) after an hour or so - presume the game is GPU limited. Corsair AX1600i PSU doesn't spin up - gives a brief spin up at boot then just runs passive (think it starts spinning at above 600w or so wattage draw).
Here's a few pics
20230213_232438_HDR by Tom ., on Flickr
20230213_232417_HDR by Tom ., on Flickr
20230213_215038_HDR by Tom ., on Flickr
20230213_215105_HDR by Tom ., on FlickrMonkey Puzzle
Member
Not really an update, just a few extra phone photos in daylight:
 20230226_165447_HDR by Tom ., on Flickr
 20230225_163211_HDR by Tom ., on Flickr
 20230225_163149_HDR by Tom ., on Flickr
20230226_165447_HDR by Tom ., on Flickr
20230225_163211_HDR by Tom ., on Flickr
20230225_163149_HDR by Tom ., on FlickrMonkey Puzzle
Member
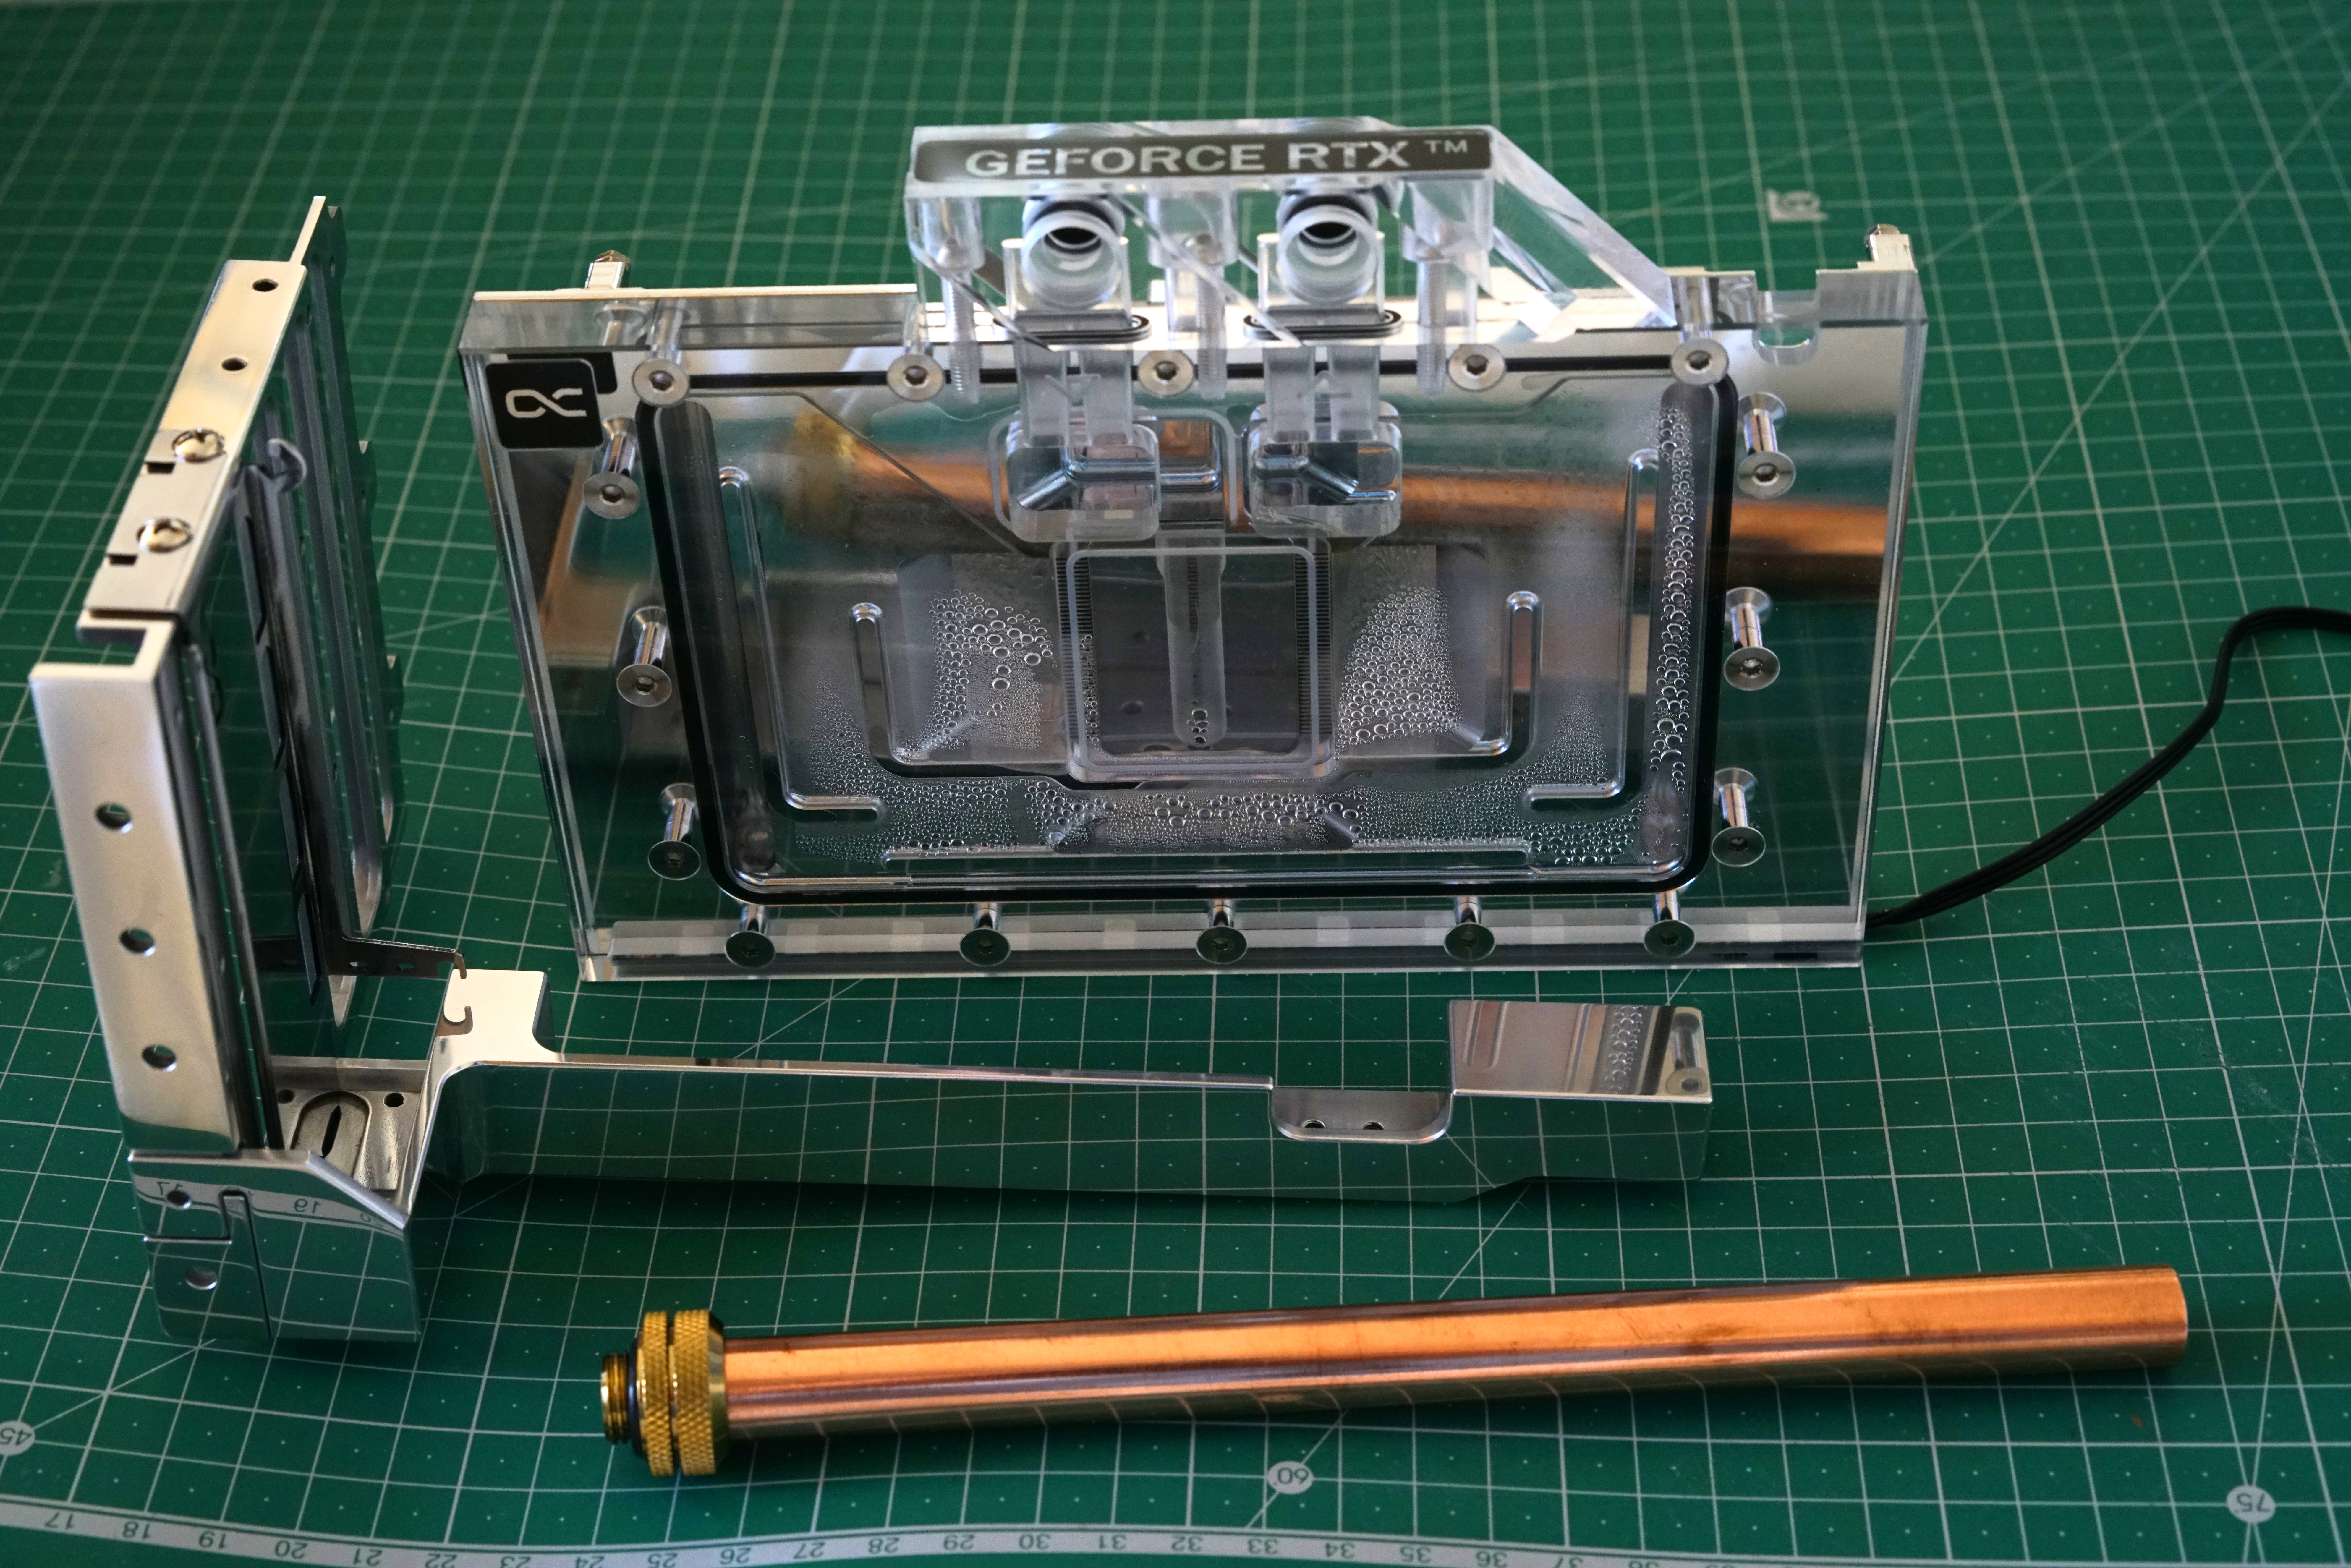
Few photos of PCI bracket and the lovely Alphacool Eisblock Aurora GTX4090 water block Alphacool generously sponsored the project with (vielen dank!).
Bit of work done; heated 14mm OD/12mm ID copper tubing to anneal, straightened with an inner 12mm solid soft silicone tube, outer spring steel pipe straightener spring, and a flat surface (10mm thick aluminium plate). Still very frustrating to get 100% straight. Deoxidised with vinegar and salt soak, deburred ends, polished tubes.
Got some shorter tubes that are straight but semi-hard, so will have to see if they bend okay in the 14mm tube bender...
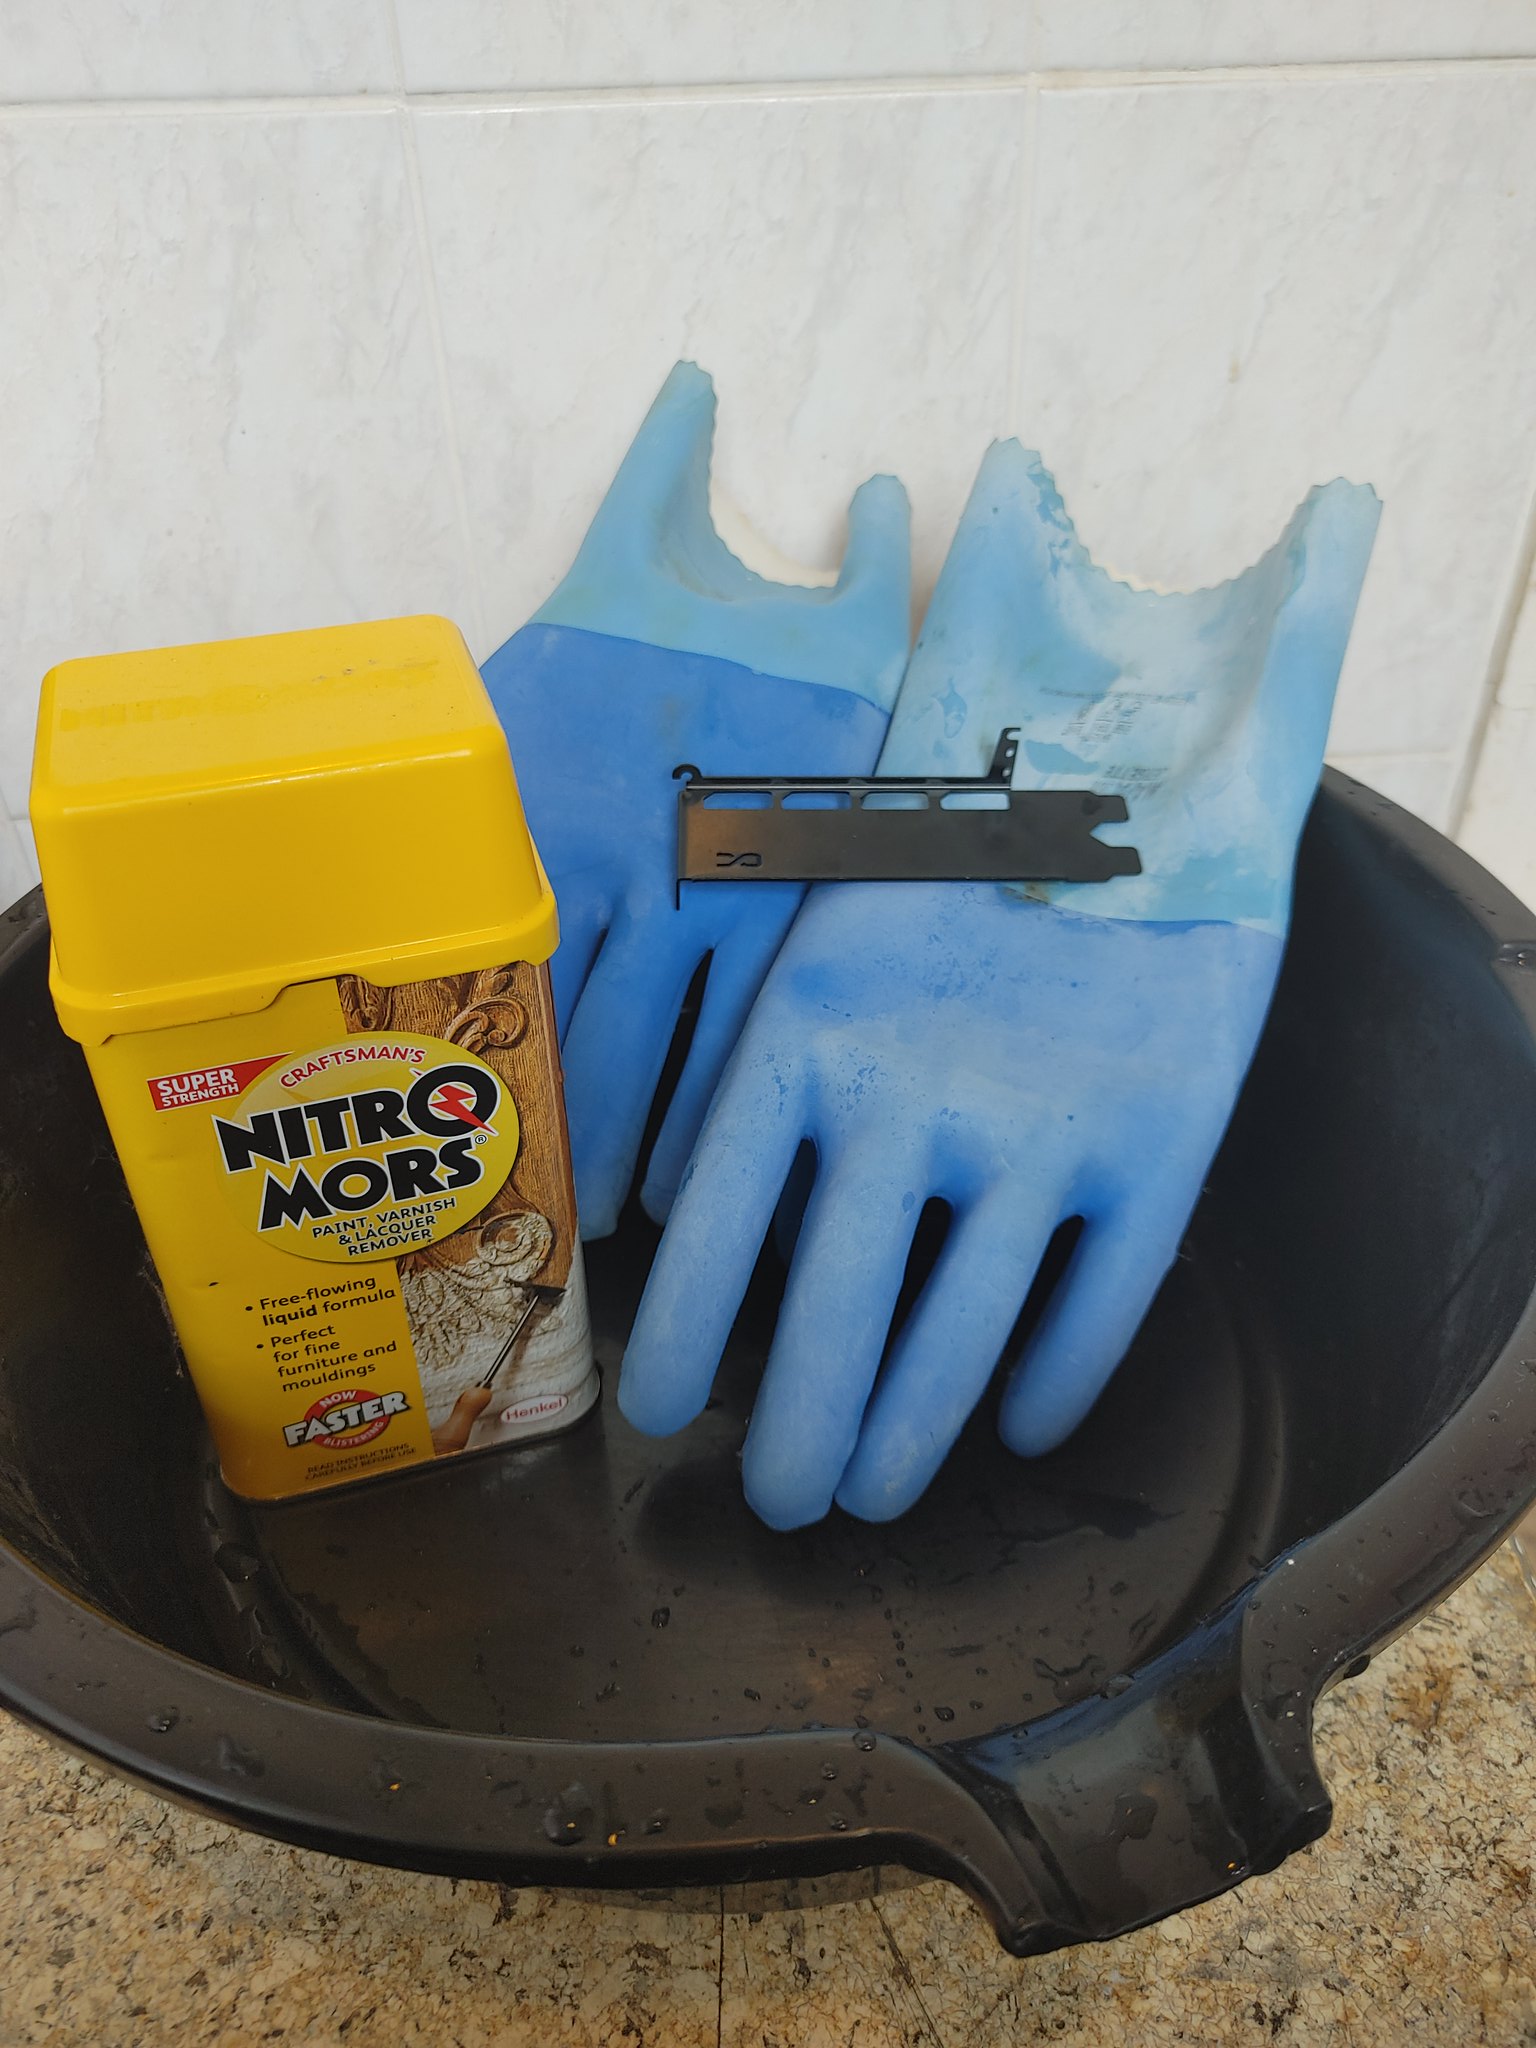
Polished the Bitspower vertical GP bracket as black and material blasted didn't match the build's shiny aluminium colour scheme. Realised the sponsored Alphacool Eisblock 4090 waterblock PCI I/O plate is black...
 20230326_123800 by Tom ., on Flickr
Whatever it is coating it, paint or plasticoat, you can buy Alphacool's GPU waterblock and rest assured it is very durable! That nitromors didn't touch it. Neither did paint thinner soak/scrub. Needed physical abrasion in the end!
Next up over Easter is disassembling loop, dremeling the PCI I/O bracket to attach the bitspower vertical GPU bracket, fitting GPU block, bending cutting and fitting copper hard tubing.
Here's some shiny pictures in the meantime (excuse the condensation!)...
Before:
 20230102_224607_HDR by Tom ., on Flickr
 20230105_154148_HDR by Tom ., on Flickr
After:
 PSX_20230407_182333 by Tom ., on Flickr
 20230407_173335~2 by Tom ., on Flickr
 20230407_170835~2 by Tom ., on Flickr
High res non-mobile photo:
 DSC07468 by Tom ., on Flickr
Bit of work done; heated 14mm OD/12mm ID copper tubing to anneal, straightened with an inner 12mm solid soft silicone tube, outer spring steel pipe straightener spring, and a flat surface (10mm thick aluminium plate). Still very frustrating to get 100% straight. Deoxidised with vinegar and salt soak, deburred ends, polished tubes.
Got some shorter tubes that are straight but semi-hard, so will have to see if they bend okay in the 14mm tube bender...
Polished the Bitspower vertical GP bracket as black and material blasted didn't match the build's shiny aluminium colour scheme. Realised the sponsored Alphacool Eisblock 4090 waterblock PCI I/O plate is black...
20230326_123800 by Tom ., on FlickrWhatever it is coating it, paint or plasticoat, you can buy Alphacool's GPU waterblock and rest assured it is very durable! That nitromors didn't touch it. Neither did paint thinner soak/scrub. Needed physical abrasion in the end!
Next up over Easter is disassembling loop, dremeling the PCI I/O bracket to attach the bitspower vertical GPU bracket, fitting GPU block, bending cutting and fitting copper hard tubing.
Here's some shiny pictures in the meantime (excuse the condensation!)...
Before:
20230102_224607_HDR by Tom ., on Flickr
20230105_154148_HDR by Tom ., on FlickrAfter:
PSX_20230407_182333 by Tom ., on Flickr
20230407_173335~2 by Tom ., on Flickr
20230407_170835~2 by Tom ., on FlickrHigh res non-mobile photo:
DSC07468 by Tom ., on Flickr
Last edited:
Monkey Puzzle
Member
Fiddling round with pump positioning, case lying on its back on a polystyrene sheet. Might be the shortest ever hard tube to connect!
 20230410_194342_Edited by Tom ., on Flickr
20230410_194342_Edited by Tom ., on FlickrMonkey Puzzle
Member
Took a dremel to the I/O PCI card aluminium bracket to fit the vertical GPU bracket which is resting on it in this photo (those horizontal struts with the pressed grooves seen behind it had to be cut to fit it, 3 countersunk M4 holes drilled to attach it at the front, and 5 m3 holed redrilled and tapped as countersunk M4 instead at the side to attach the vertical GPU bracket.
 PSX_20230429_181207 by Tom ., on Flickr
Vertical GPU bracket fitted:
 20230429_152606~2 by Tom ., on Flickr
 PSX_20230429_174845 by Tom ., on Flickr
 PSX_20230429_175205 by Tom ., on Flickr
I drilled and tapped five 6-32 UNC holes to attach the vertical PSU bracket: This is the back of the case - the PSU will sit up and behind the case unseen (and not impede passive airflow in the case). The case needs some space around it for airflow from the bottom anyhow so mounting the PSU on the back won't really affect case footprint. It's not really seen behind the case, and the PSU is black, so may leave the PSU bracket as it is here rather than strip and polish it.
 PSX_20230429_180058 by Tom ., on Flickr
 PSX_20230429_175608 by Tom ., on Flickr
PSX_20230429_181207 by Tom ., on FlickrVertical GPU bracket fitted:
20230429_152606~2 by Tom ., on Flickr
PSX_20230429_174845 by Tom ., on Flickr
PSX_20230429_175205 by Tom ., on FlickrI drilled and tapped five 6-32 UNC holes to attach the vertical PSU bracket: This is the back of the case - the PSU will sit up and behind the case unseen (and not impede passive airflow in the case). The case needs some space around it for airflow from the bottom anyhow so mounting the PSU on the back won't really affect case footprint. It's not really seen behind the case, and the PSU is black, so may leave the PSU bracket as it is here rather than strip and polish it.
PSX_20230429_180058 by Tom ., on Flickr
PSX_20230429_175608 by Tom ., on FlickrMonkey Puzzle
Member
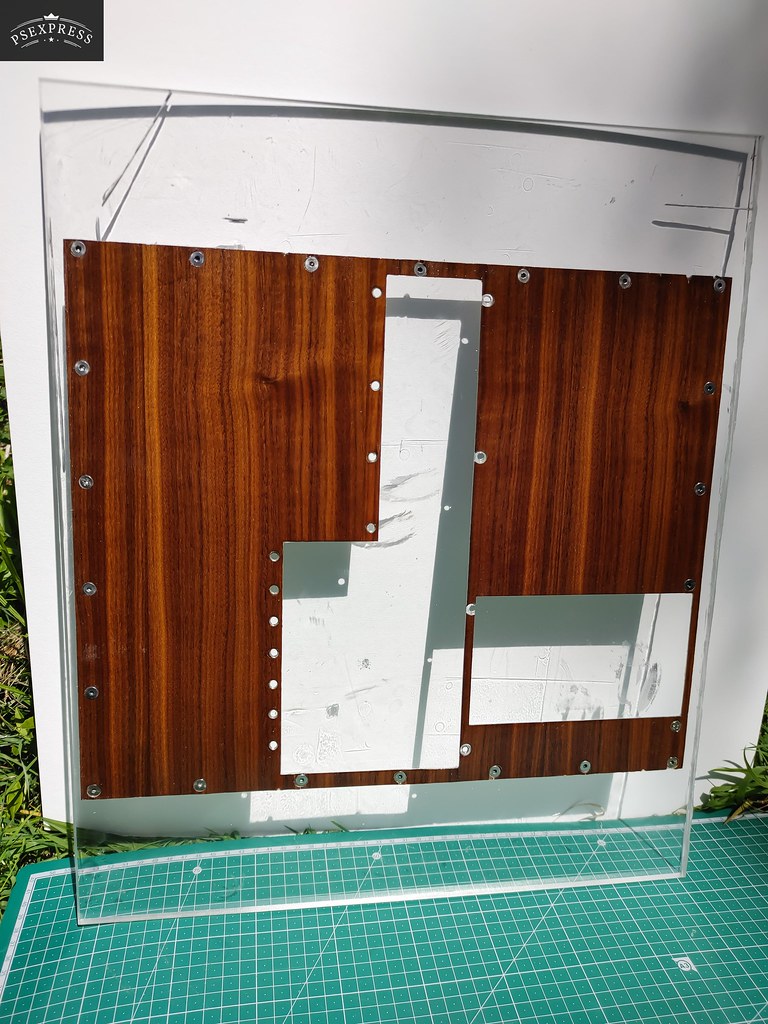
Made a jig (from a slightly sorry looking 10mm thick sheet of plexiglass) to keep the veneered backwall flat for sanding and coating with more coats of 'finishing oil' - the backwall is thin and fiddly and tricky to sand between coats and needs to be flat for applying the oil (and messy if this is done installed in the alumunium frame) without damaging the veneer edges otherwise. Just 22 countersunk m4 holes later :-( :
 PSX_20230503_132224 by Tom ., on Flickr
 PSX_20230503_132414 by Tom ., on Flickr
PSX_20230503_132224 by Tom ., on Flickr
PSX_20230503_132414 by Tom ., on FlickrMonkey Puzzle
Member
Merry Christmas all, it's been a while.
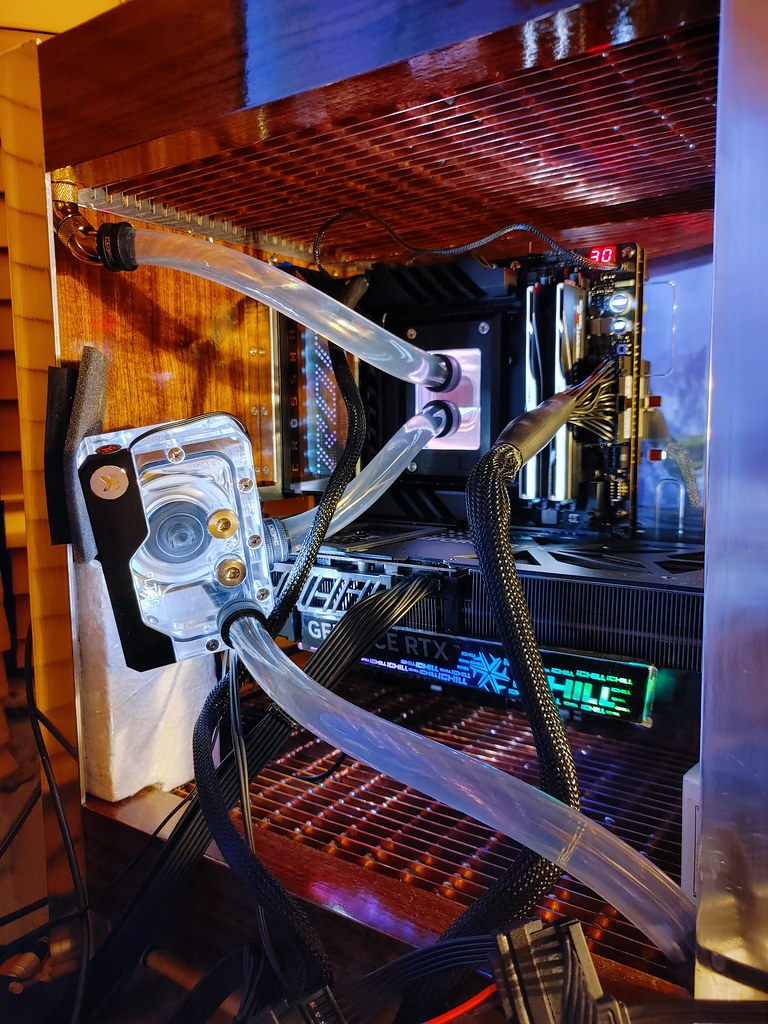
Since the last update I made a pump bracket benhind the pc case with a hole it pokes through, so just the pump reservoir protrudes into the case.
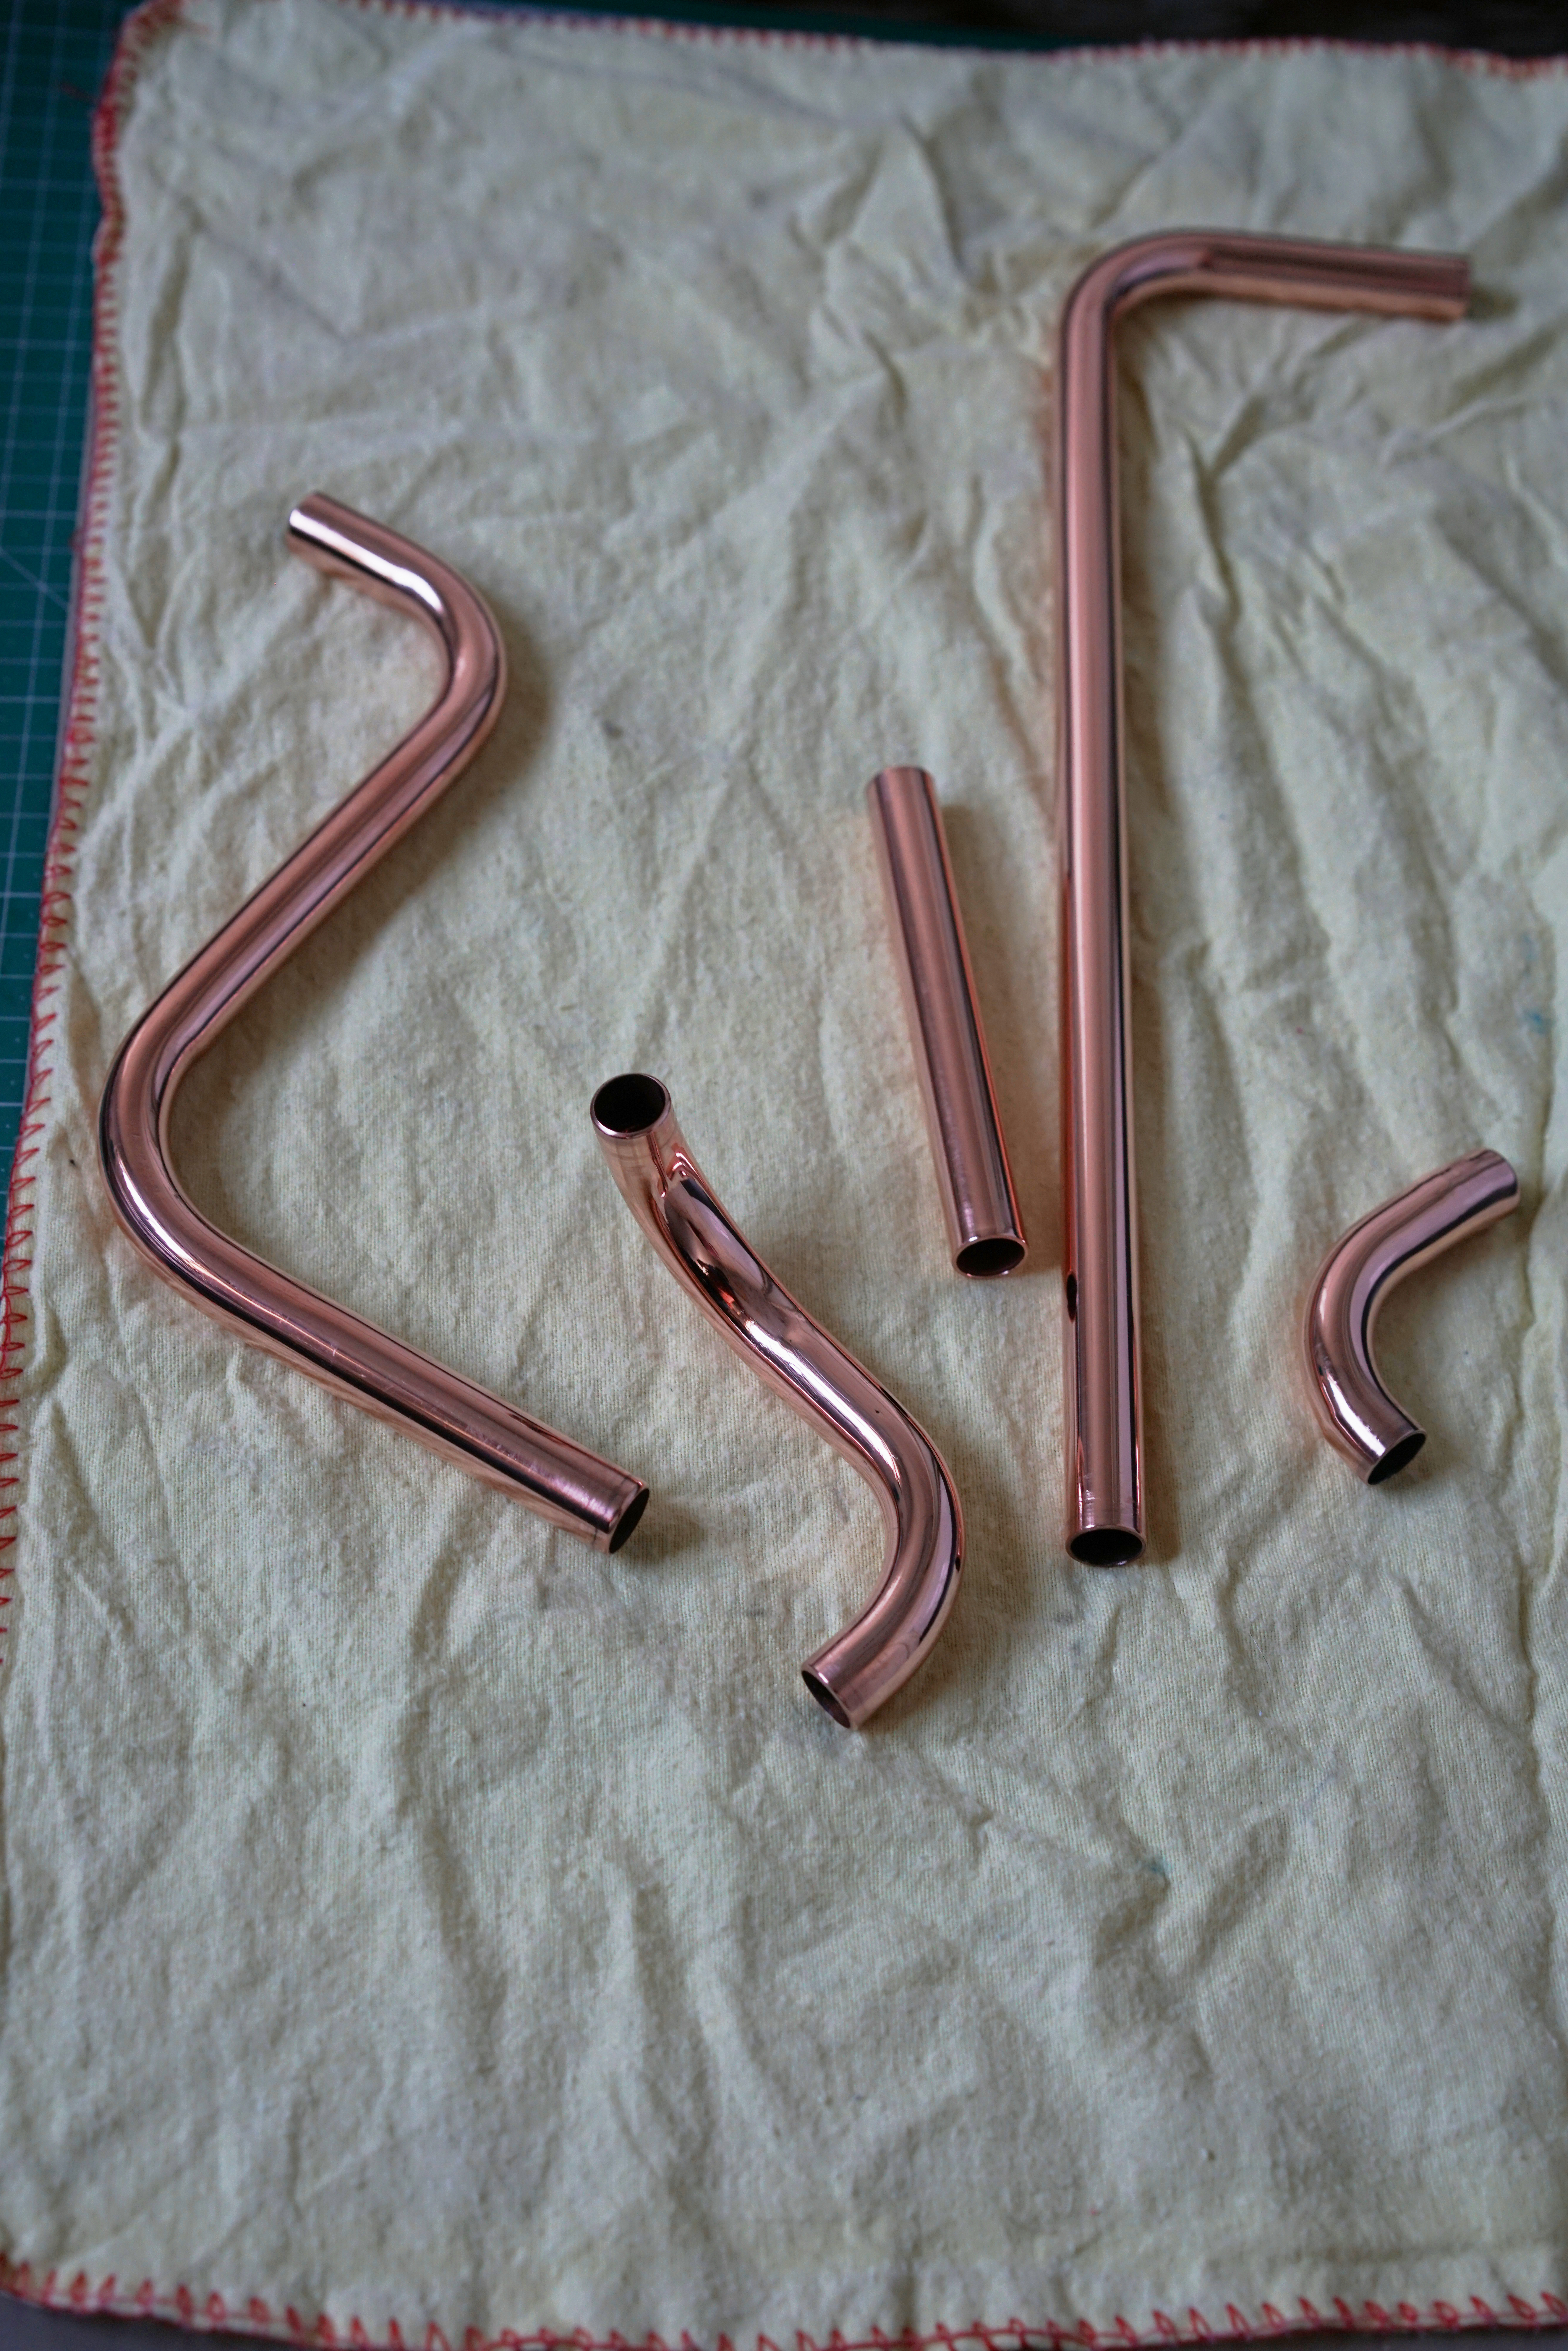
A lot of time and effort have gone into bending the 14mm copper pipes for the hard-tubing, and if I'm honest I procrastinated for a good while because I found this very annoying - it's easy to put a lot of time in only to find the tubes were a little off and needed to be redone. I'd replaced the clear acrylic inlet and outlet port block from the Alphacool Eisblock aurora block they kindly sponsored the project with with an alphacool delrin one instead that you can see in the photos below. It changes the orientation of the inlet and outlet ports and makes plumbing easier with a vertical gpu on a riser block and cuts down on 90 degree bends - might be somewhat pointless with the restriction from the GP and CPU blocks, but every little helps in lowering restriction and allowing a lower and quieter pump speed! I used a hand pipe bender for 14mm copper tube. It's inaccurate and tricky to get the bends clean without scouring into the soft copper leaving a dent. After a lot of trial and error I found barrow black painted copper prebent pipes are easiest to work with - the copper is still soft apart from where it's been work-hardened at the prebent 90 degree bends, which saves having to heat the copper to anneal it, and means not having to then subsequently give the copper an acid bath to remove the oxidised copper inside the pipe (which leaves nasty copper salts behind that are a pain to remove and risk crapping up the water loop.) I used stainless steel 12mm rods to run inside the copper pipe to hold the pipe in place, and removed the paint with 0000 grade steel wool soaked in acetone, and used the rods again to keep the soft copper from getting deformed when polishing and for bevelling the ends of the copper pipes after cutting with sandpaper, so they easily pass the O-rings in the compression fittings. Without smooth bevelling they mangle the orings and are tricky to add/remove the pipes in my experience). Removing the pipes is actually quite quick and easy - the aluminium motherboard tray can flex back a couple of mm which is needed for the pipes to get into the bottom bit of the compression fittings, and the pump is sat in a bracket surrounded by squidgy sorbothane hemispheres so can move around by several mm in all directions to allow pipe fitting.
These photos are a bit of a cheat - this is bare polished copper; I'll still need to drain the loop to remove the pipes to repolish and lacquer at some stage to prevent the copper tarnishing over time, but the polished copper looks so pretty I thought some photos first would be nice.
Some polished and bent copper pipes - the little z shaped one is from pump to GPU block, the bigger z from CPU to the radiator. The small 90 degree one has a small band of around 15 degrees at one side that's tricky to see. The long pipe with a 90 degree and the short straight pipe connect with a 45 degree fitting to give a pipe that runs from the radiator back to the pump reservoir.
 DSC07620
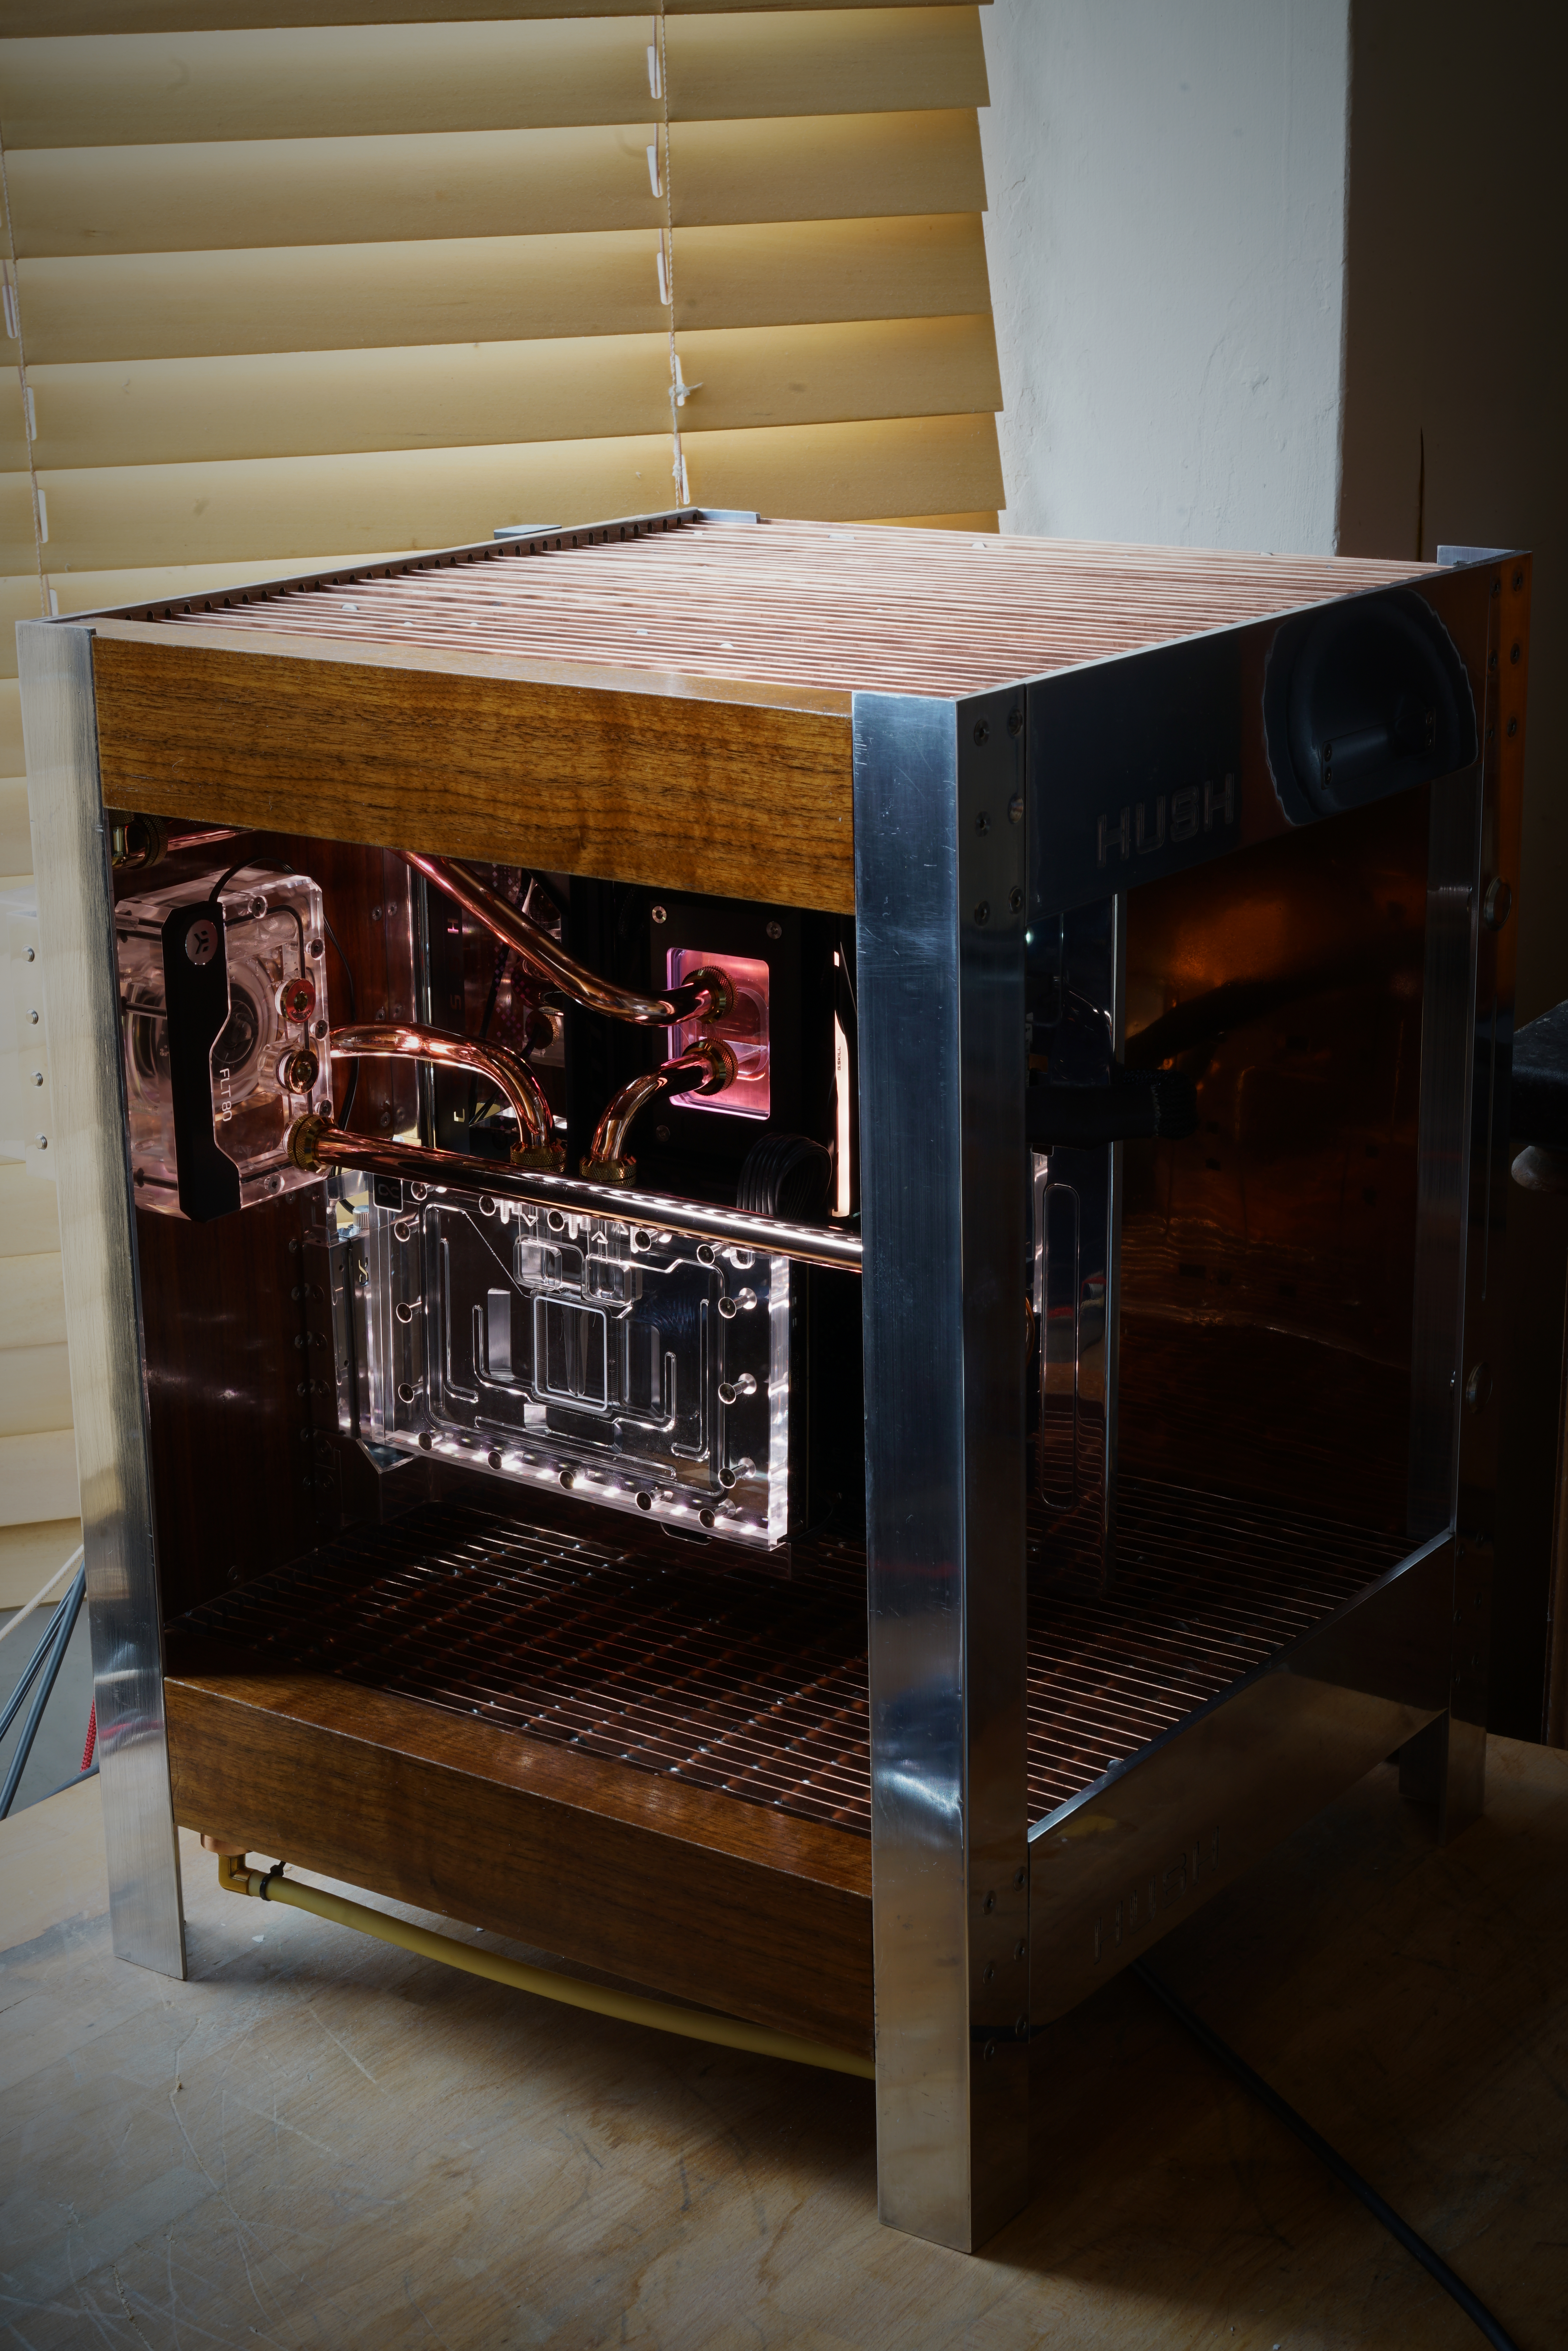
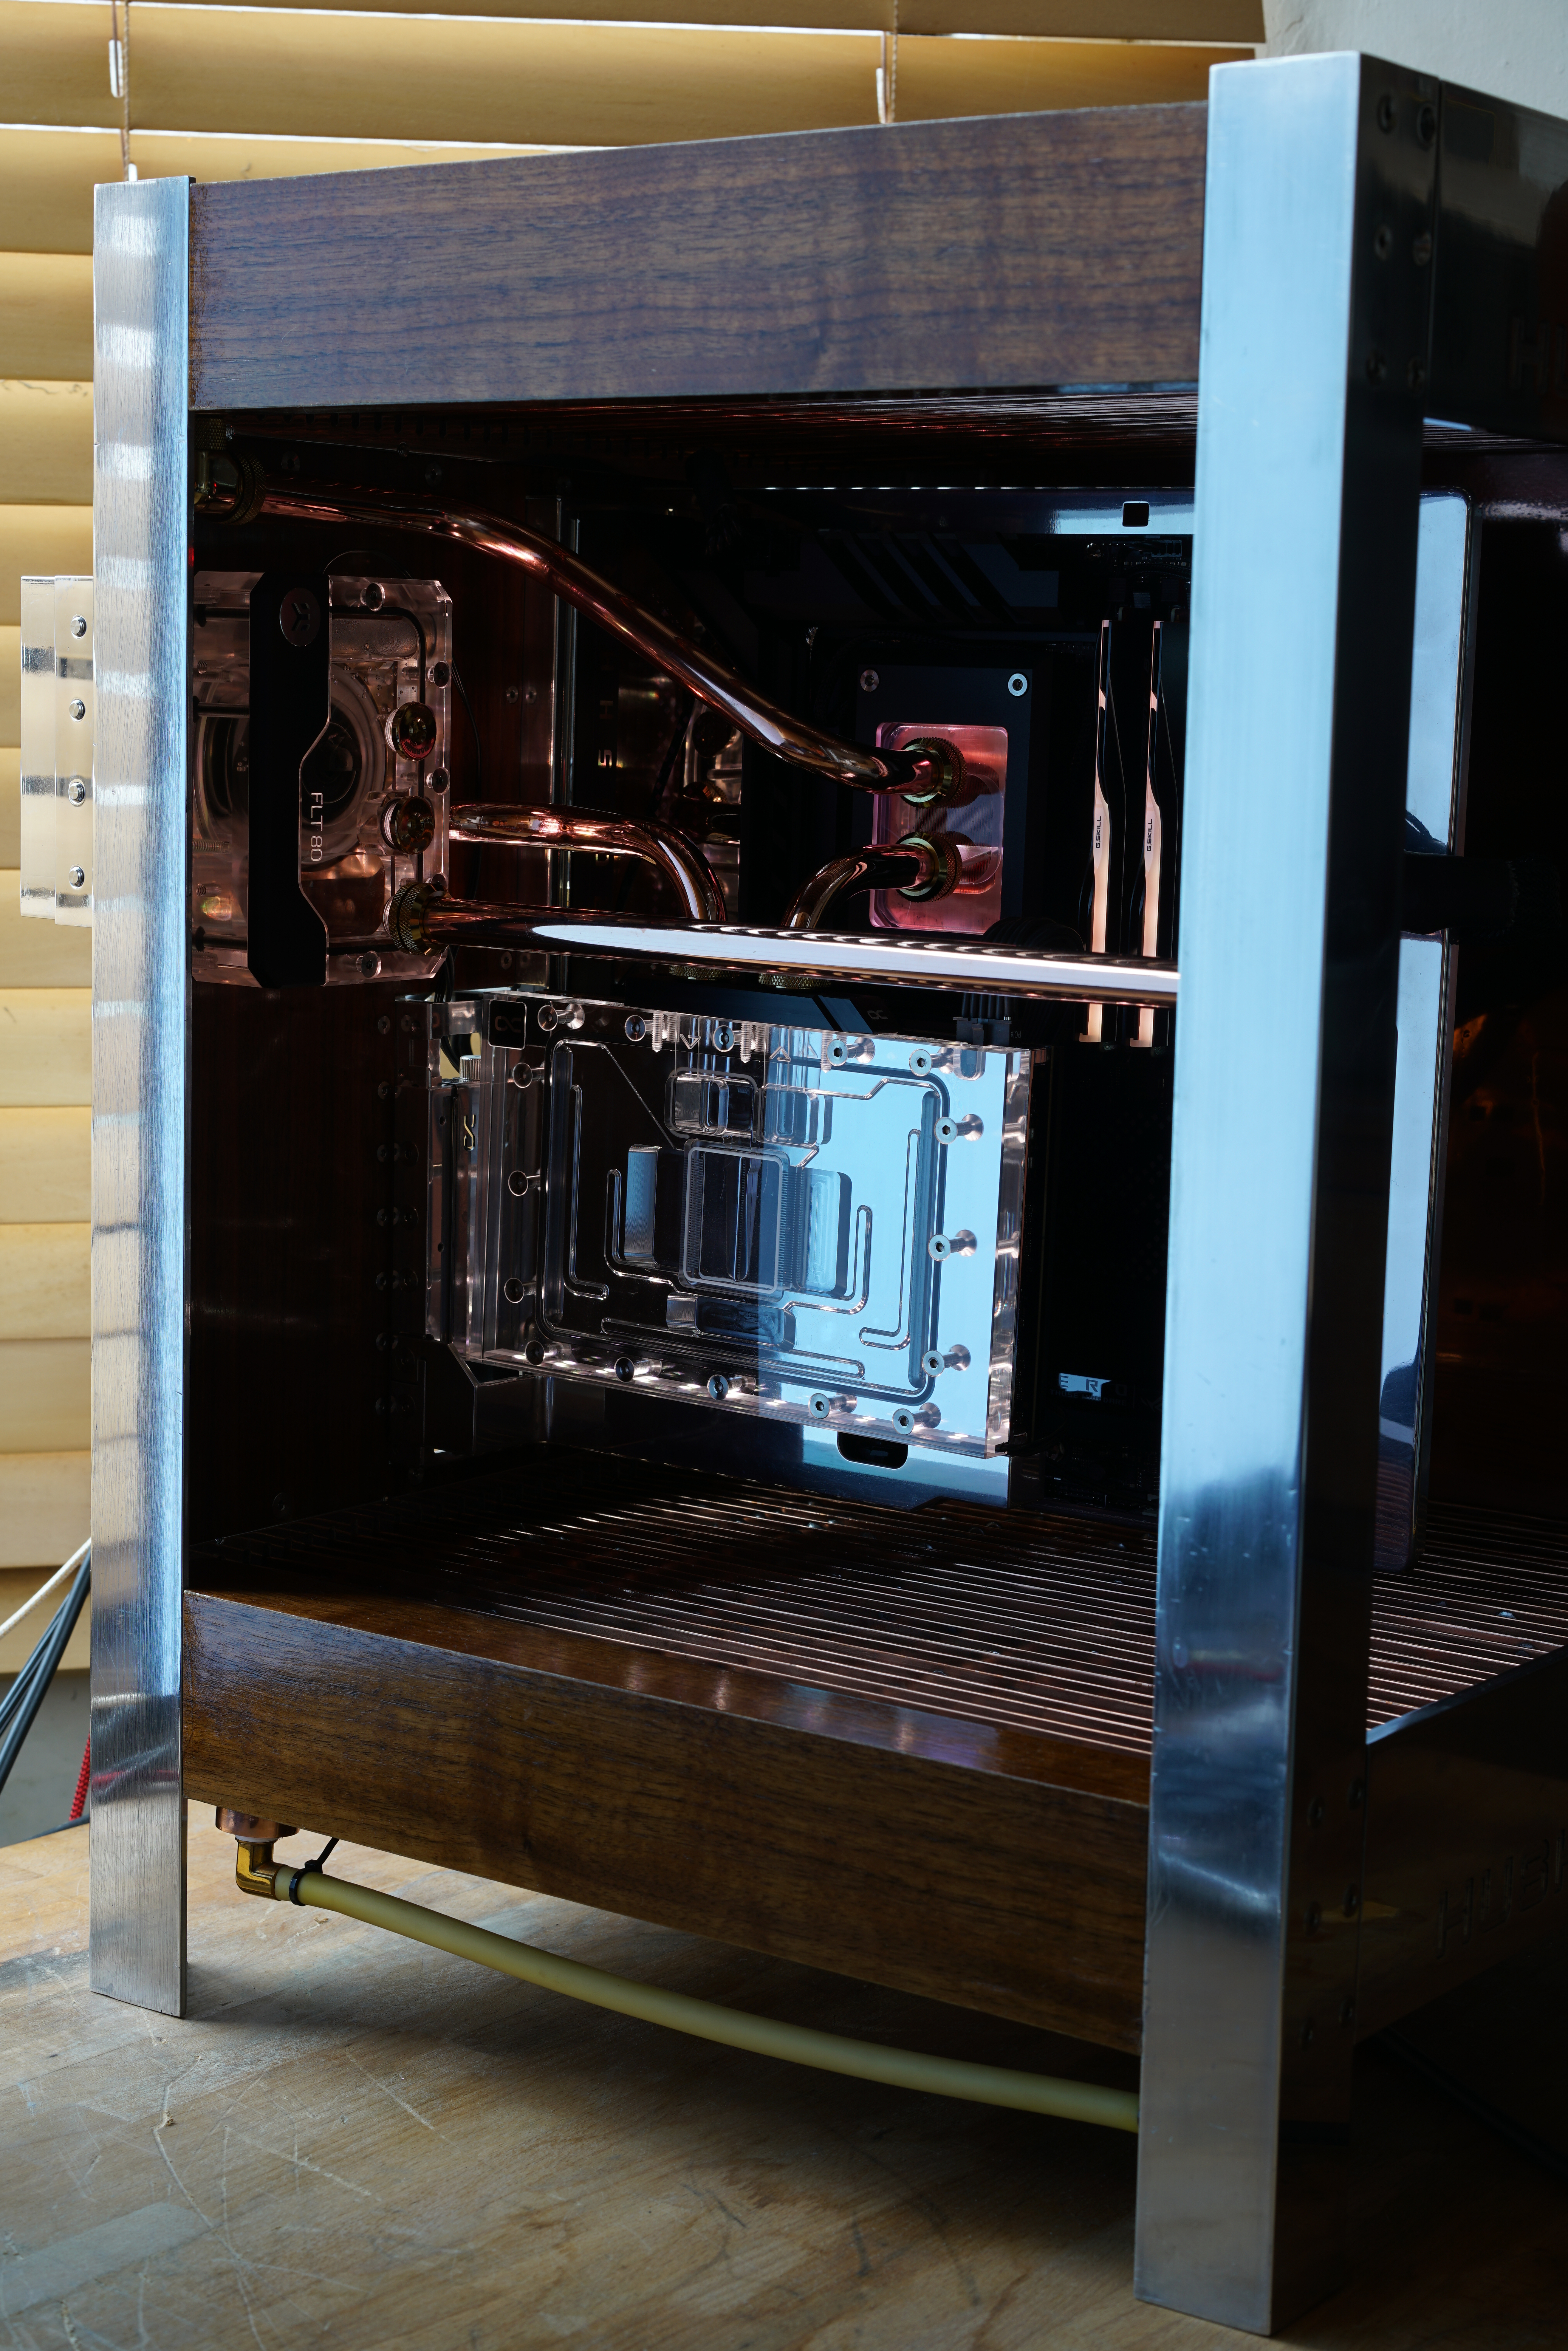
All plumbed up! There's pretty much enough light from the LED strips in the reservoir and CPU and GPU blocks not to need to use the led strips that are hidden behind the front aluminium frame.
 DSC07630
 DSC07645
 DSC07641
I'm not sure if the polishing and removal of all the burnt flux coating the copper fins and pipes of the radiator has done it, or what the case is, but cooling performance seems to have improved. I still need to tinker and see what the performance is like with the pump at lower speeds - the ASUS BIOS is not clear in how to adjust pump speed and I've only just figured out how to do it, but it still seems limited to adjusting pump speed by CPU temperature rather than the water temperature sensor (there's a g1/4 gold screw in temperature probe hiding in the reservoir port beneath the pump outlet port in the photos). I'm going to need to replace the massive bulky cables that come with the ax1600i PSU which is hidden vertically behind the case - you can see the power cable to the PSU in a few of the photos..
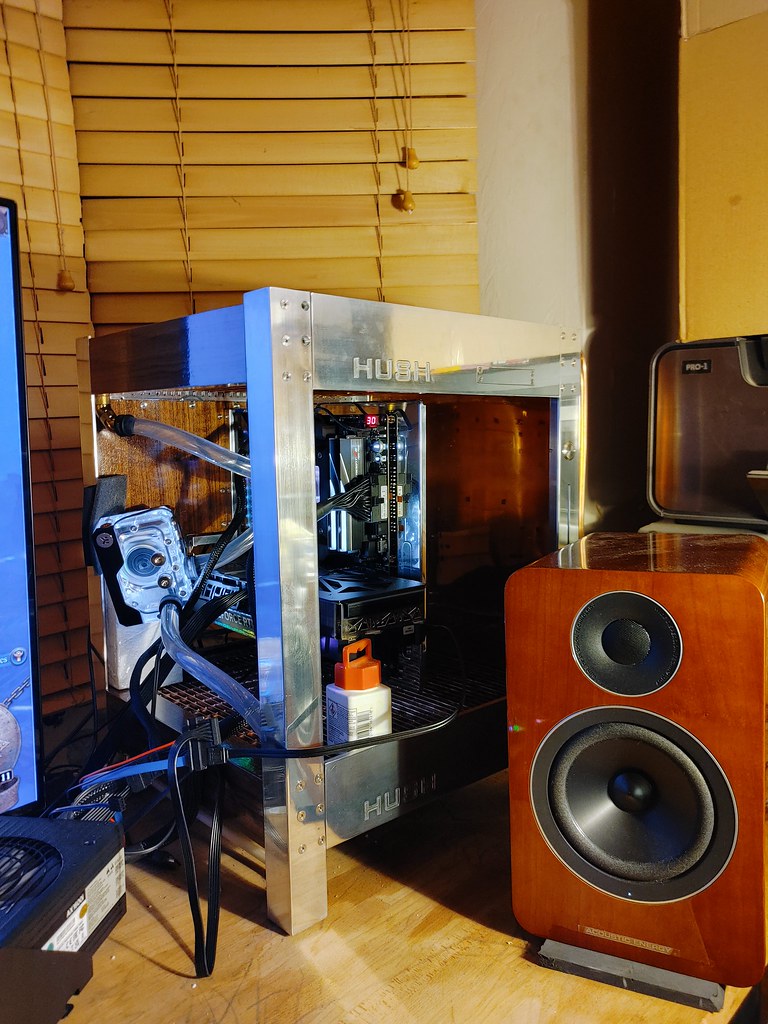
Noise-wise, at full speed the pump is quietly audible - the hard piping is certainly not helping I think, but it looks nice so it stays! At 20% speed (~950rpm) I can't hear the pump over the rooms ambient noise floor. I now notice that my 4090 has some mild coil whine when its rendering over ~150FPS in 3D mark testing - I'd thought it had none when it had the air-cooler on.
The PC has a D5 pump, INNO3D 4090 (450w card) and 7950x CPU. With the pump at around 30 percent speed (~1400rpm) when gaming the GPU overclocked at a little over 3GHz core and 11600Mhz memory with the CPU a little overclocked at +100Mhz boost, the GPU after several hours gaming seems to settle at around 52-55 degrees centigrade with the CPU around perhaps 65-75C. From a wall meter the power draw for the PC is around 600W when gaming, with max of 808W.
Since the last update I made a pump bracket benhind the pc case with a hole it pokes through, so just the pump reservoir protrudes into the case.
A lot of time and effort have gone into bending the 14mm copper pipes for the hard-tubing, and if I'm honest I procrastinated for a good while because I found this very annoying - it's easy to put a lot of time in only to find the tubes were a little off and needed to be redone. I'd replaced the clear acrylic inlet and outlet port block from the Alphacool Eisblock aurora block they kindly sponsored the project with with an alphacool delrin one instead that you can see in the photos below. It changes the orientation of the inlet and outlet ports and makes plumbing easier with a vertical gpu on a riser block and cuts down on 90 degree bends - might be somewhat pointless with the restriction from the GP and CPU blocks, but every little helps in lowering restriction and allowing a lower and quieter pump speed! I used a hand pipe bender for 14mm copper tube. It's inaccurate and tricky to get the bends clean without scouring into the soft copper leaving a dent. After a lot of trial and error I found barrow black painted copper prebent pipes are easiest to work with - the copper is still soft apart from where it's been work-hardened at the prebent 90 degree bends, which saves having to heat the copper to anneal it, and means not having to then subsequently give the copper an acid bath to remove the oxidised copper inside the pipe (which leaves nasty copper salts behind that are a pain to remove and risk crapping up the water loop.) I used stainless steel 12mm rods to run inside the copper pipe to hold the pipe in place, and removed the paint with 0000 grade steel wool soaked in acetone, and used the rods again to keep the soft copper from getting deformed when polishing and for bevelling the ends of the copper pipes after cutting with sandpaper, so they easily pass the O-rings in the compression fittings. Without smooth bevelling they mangle the orings and are tricky to add/remove the pipes in my experience). Removing the pipes is actually quite quick and easy - the aluminium motherboard tray can flex back a couple of mm which is needed for the pipes to get into the bottom bit of the compression fittings, and the pump is sat in a bracket surrounded by squidgy sorbothane hemispheres so can move around by several mm in all directions to allow pipe fitting.
These photos are a bit of a cheat - this is bare polished copper; I'll still need to drain the loop to remove the pipes to repolish and lacquer at some stage to prevent the copper tarnishing over time, but the polished copper looks so pretty I thought some photos first would be nice.
Some polished and bent copper pipes - the little z shaped one is from pump to GPU block, the bigger z from CPU to the radiator. The small 90 degree one has a small band of around 15 degrees at one side that's tricky to see. The long pipe with a 90 degree and the short straight pipe connect with a 45 degree fitting to give a pipe that runs from the radiator back to the pump reservoir.
DSC07620All plumbed up! There's pretty much enough light from the LED strips in the reservoir and CPU and GPU blocks not to need to use the led strips that are hidden behind the front aluminium frame.
DSC07630
DSC07645
DSC07641I'm not sure if the polishing and removal of all the burnt flux coating the copper fins and pipes of the radiator has done it, or what the case is, but cooling performance seems to have improved. I still need to tinker and see what the performance is like with the pump at lower speeds - the ASUS BIOS is not clear in how to adjust pump speed and I've only just figured out how to do it, but it still seems limited to adjusting pump speed by CPU temperature rather than the water temperature sensor (there's a g1/4 gold screw in temperature probe hiding in the reservoir port beneath the pump outlet port in the photos). I'm going to need to replace the massive bulky cables that come with the ax1600i PSU which is hidden vertically behind the case - you can see the power cable to the PSU in a few of the photos..
Noise-wise, at full speed the pump is quietly audible - the hard piping is certainly not helping I think, but it looks nice so it stays! At 20% speed (~950rpm) I can't hear the pump over the rooms ambient noise floor. I now notice that my 4090 has some mild coil whine when its rendering over ~150FPS in 3D mark testing - I'd thought it had none when it had the air-cooler on.
The PC has a D5 pump, INNO3D 4090 (450w card) and 7950x CPU. With the pump at around 30 percent speed (~1400rpm) when gaming the GPU overclocked at a little over 3GHz core and 11600Mhz memory with the CPU a little overclocked at +100Mhz boost, the GPU after several hours gaming seems to settle at around 52-55 degrees centigrade with the CPU around perhaps 65-75C. From a wall meter the power draw for the PC is around 600W when gaming, with max of 808W.